编译安装 apache2.4
// yum安装必要依赖工具:
# yum -y install gcc gcc-c++ make expat-devel openssl openssl-devel
// /usr/local/src 目录,我一般用来存放源码包等各种下载的文件
// /usr/local 一般作为软件安装目录
// 切换到 /usr/local/src 目录
# cd /usr/local/src

// 下载需要的软件,版本自选或者选下载下来然后用ftp上传文件到这个目录下
# wget http://archive.apache.org/dist/httpd/httpd-2.4.39.tar.gz
# wget https://mirror.bit.edu.cn/apache//apr/apr-1.7.0.tar.gz
# wget https://mirror.bit.edu.cn/apache//apr/apr-util-1.6.1.tar.gz
# wget https://ftp.pcre.org/pub/pcre/pcre-8.43.tar.gz
// # wget http://mirrors.tuna.tsinghua.edu.cn/apache//apr/apr-1.7.0.tar.gz
// # wget http://mirrors.tuna.tsinghua.edu.cn/apache//apr/apr-util-1.6.1.tar.gz
// # wget https://jaist.dl.sourceforge.net/project/pcre/pcre/8.43/pcre-8.43.tar.gz
//解压释放 httpd-2.4.18.tar.bz2 压缩包
# tar -zxvf httpd-2.4.18.tar.bz2
//解压释放 apr-1.7.0.tar.gz 压缩包
# tar –zxvf apr-1.7.0.tar.gz
//解压释放 apr-util-1.6.1.tar.gz 压缩包
# tar –zxvf apr-util-1.6.1.tar.gz
//解压释放 pcre-8.43.tar.gz 压缩包
# tar –zxvf pcre-8.43.tar.gz
注意: apr 用 apr-1.5.2.tar.gz ,apr-uti 用apr-util-1.5.4.tar.gz 这样安装apache 才不会出现错误和无法启动【AH00141: Could not initialize random number generator 这个奇怪问题】
★整理了顺利安装的软件:
1. apr-1.5.2.tar.gz
2. apr-util-1.5.4.tar.gz
3. pcre-8.43.tar.gz
4. httpd-2.4.25.tar.gz
5. mod_fcgid-2.3.9.tar.gz
[1]编译安装apr,进入解压好的apr-1.5.2.tar.gz压缩文件的解压目录【/usr/local/src/apr-1.5.2】
# apr-1.5.2
# ./configure --prefix=/usr/local/apr
# make
# make install
//上面的配置参数--prefix就是指定安装目录
[2]编译安装 apr-util,进入解压好的apr-util-1.5.4.tar.gz压缩文件的解压目录【/usr/local/src/apr-util-1.5.4】[说明:apr-uti 使用1.5版本的apr-util-1.5.*.tar.gz ,这样安装apache不会出错]

# cd apr-util-1.5.4
# ./configure --prefix=/usr/local/apr-util --with-apr=/usr/local/apr
# make
# make install
//上面配置参数的--with-apr表示apr-util安装需要依赖apr,所以指定apr的安装目录,到这里apr-util也安装完成了
[3]编译安装 pcre,进入解压好的pcre-8.43.tar.gz压缩文件的解压目录 【/usr/local/src/pcre-8.43】
# cd pcre-8.43
# ./configure --prefix=/usr/local/pcre
# make
# make install
// # make && make install
[4]编译安装Apache,进入解压好的httpd-2.4.25.tar.gz压缩文件的解压目录 【/usr/local/src/httpd-2.4.25】
# cd httpd-2.4.25
# ./configure --prefix=/usr/apache24 --with-apr=/usr/local/apr --with-apr-util=/usr/local/apr-util --with-pcre=/usr/local/pcre --enable-ssl --enable-so --with-zlib --enable-dav --enable-mods-shared=all --with-egd --with-devrandom --enable-cache=shared --enable-disk_cache=shared --enable-mem_cache=shared --enable-proxy=shared --enable-proxy_connect=shared --enable-proxy_ftp=shared --enable-proxy_http=shared --enable-file_cache=shared --enable-charset_lite=shared --enable-case_filter=shared --enable-case_filter_in=shared
# make && make install
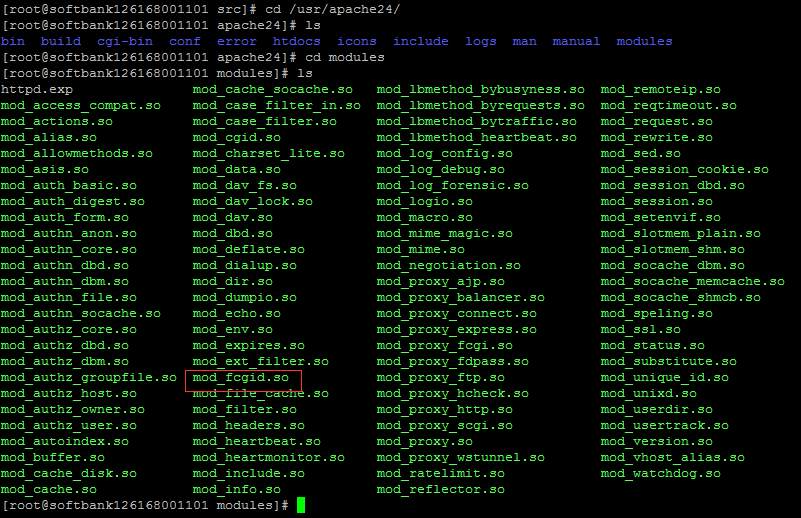
[5]安装Apache的 mod_fcgid 模块。
//在Apache官网下载mod_fcgid源码包,当前下载的版本是mod_fcgid2.3.9,或者用ftp工具上传到服务器
# wget https://mirrors.tuna.tsinghua.edu.cn/apache//httpd/mod_fcgid/mod_fcgid-2.3.9.tar.gz
//解压释放 mod_fcgid-2.3.9.tar.gz 压缩包
# tar -zxvf mod_fcgid-2.3.9.tar.gz
//进入解压目录
# cd /usr/local/src/mod_fcgid-2.3.9
//使用Apache的apxs安装mod_fcgid
# APXS=/usr/apache24/bin/apxs ./configure.apxs
# make && make install
//启动Apache httpd服务
# /usr/apache24/bin/apachectl start

// 将链接apachectl 复制到系统启动目录下并命名为httpd
# cp /usr/apache24/bin/apachectl /etc/rc.d/init.d/httpd
# vi /etc/rc.d/init.d/httpd
//在第二行和第三行添加如下注释信息:
//按下Esc 键,保存退出文件编辑
# :wq!
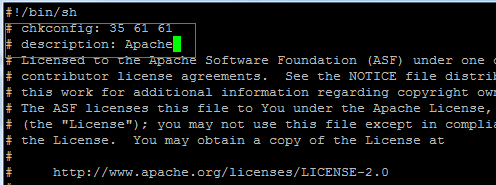
//编辑httpd脚本,在第2行添加如下注释信息:
#chkconfig: 35 61 61
#description: Apache
//保存后执行:chkconfig --add httpd
//第一行的3个参数意义分别为:在哪些运行级别启动httpd(3,5);启动序号(S61);关闭序号(K61)。注意:以上两行缺一不可
//将httpd配置开机自启动并加入linux服务监控
# chkconfig --add httpd
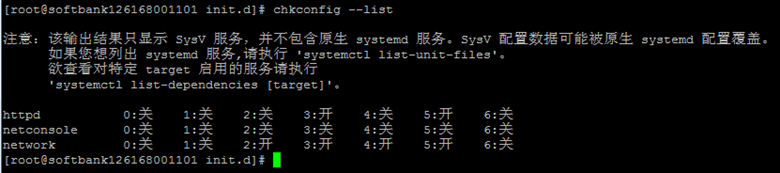
//查看是否添加成功
# chkconfig --list
//至此,apache安装完毕,可以使用 systemctl restart httpd 重启apache试一试 【systemctl start|restart|stop httpd】


//查看openssl命令路径:
# which openssl
/usr/bin/openssl
//查看版本号:
# openssl version –a
/**** 说明 *****/
//注意:如果make中出现错误,必须执行make clean清除所有缓存文件后继续,如果是在make install过程中出现错误,必须执行make clean并且删除生成了安装目录,然后重新执行make和make install
//安装完成之后删除原来释放出来的那些目录即可,如果以后要卸载,只要不忘记安装目录,直接删除安装目录就可以,也不会出现任何残留垃圾。
//zlib的安装
//查看:yum list |grep zlib* 看到的是全部都安装好的;
//这里我的虚拟机联网方式为物理连接,且ip与主机不同,但在同一网段。
//1、先确定虚拟机可不可以访问外网,可通过ping www.baidu.com测试,如果不行,先百度或者参考其他资料或setup自行配置好ip相关信息(当然,前提是你主机联网了)
//2、主机与虚拟机通过各自ip互ping ,如果主机可以ping虚拟机,而虚拟机却不可以ping主机,考虑下是不是主机电脑防火墙没有关,很多情况是这个原因,关闭防火墙可以解决。
//3、如果以上都没问题,还是没能解决,则可能是iptable的限制。通过如下命令把tcp的80端口配置为允许任何ip访问就可以了
//命令:
# iptables -I INPUT -p TCP --dport 80 -j ACCEPT
//注意linux的命令是区分大小写的
//但是,上面第三步的方法只是临时生效的,只要你重启了虚拟机或者说重启了linux,就必须重新设置才可以访问,解决办法如下:
//在命令行下输入:
# vi /etc/selinux/config
//会打开vi编辑器
//修改文件:
//将SELINUX=enforcing
//这一行注释掉,并且加上一行,如下:
#SELINUX=enforcing
SELINUX=disabled
//再保存,后继续输入命令:
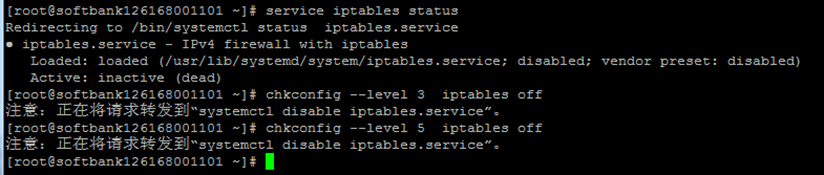
# chkconfig --level 3 iptables off
# chkconfig --level 5 iptables off
//之后重启linux,生效,就可以了
//这时主机就可以访问虚拟机开启的apache了(这里只是用apache示例,应该说可以同主机浏览器访问虚拟机ip了)
//iptables 信息读取出错:没有那个文件或目录
//查看防火墙状态时
# service iptables status

//解决方案
//1.首先停止防火墙
# systemctl stop firewalld
# systemctl mask firewalld
//2.然后安装iptables-service
# yum install iptables-services
# service iptables status
//查看ip地址
# ip addr
//然后我们输入ip查询命名 ip addr 也可以输入 ifconfig查看ip,但此命令会出现3个条目,centos的ip地址是ens33条目中的inet值
//发现 ens33 没有 inet 这个属性,那么就没法通过IP地址连接虚拟机
//接着来查看ens33网卡的配置: vi /etc/sysconfig/network-scripts/ifcfg-ens33 注意vi后面加空格
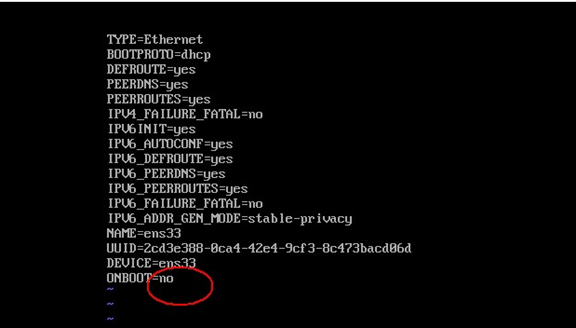
//从配置清单中可以发现 CentOS 7 默认是不启动网卡的(ONBOOT=no)
//把这一项改为YES(ONBOOT=yes)
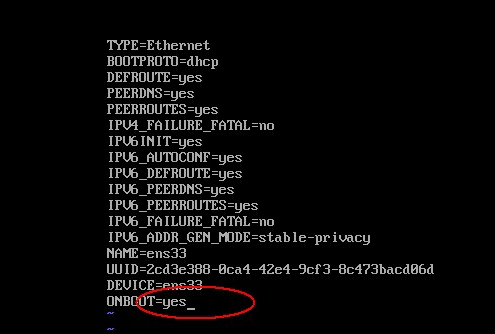
//然后按 Esc 退出 再出入命令 :wq 再按Enter即可 (备注 :wq 是保存然后退出的意思)
//然后重启网络服务: sudo service network restart
// arp 和 apr-util 下载地址
https://archive.apache.org/dist/apr/
// pcre 的下载地址
https://ftp.pcre.org/pub/pcre/
https://sourceforge.net/projects/pcre/
// Apache 下载地址
http://archive.apache.org/dist/httpd/
参考文章链接:
https://www.cnblogs.com/freeweb/p/5177516.html
https://www.cnblogs.com/lz0925/p/11227063.html
https://blog.51cto.com/qq512430/1914420
https://blog.csdn.net/gouhexiong1989/article/details/78694037
https://www.cnblogs.com/chjw8016/p/5926617.html 【添加自编译的apache为linux系统服务】
https://blog.csdn.net/weixin_42913025/article/details/95230869 【解决:服务 iptables 信息读取出错:没有那个文件或目录】
== 2024-02-03 更新start ==
「CentOS7.8系统下」安装apache的软件,测试通过。
安装之前,要把系统里的软件更新,如:
# sudo yum update
yum命令更新操作可以参考【CentOS7.3下编译安装 多版本php】。
Apache下载地址:
http://archive.apache.org/dist/httpd/httpd-2.4.57.tar.gz
Apache mod_fcgid 模块下载地址:
https://dlcdn.apache.org/httpd/mod_fcgid/mod_fcgid-2.3.9.tar.gz
Apache的apr-1.7.4.tar.gz 下载地址:
https://dlcdn.apache.org//apr/apr-1.7.4.tar.gz
Apache的 apr-util-1.6.3.tar.gz 下载地址:
https://dlcdn.apache.org//apr/apr-util-1.6.3.tar.gz
pcre下载地址:pcre-8.45.tar.gz
https://sourceforge.net/projects/pcre/
== 2024-02-03 更新end ==