# yum install -y gcc gcc-c++ make libtool zlib zlib-devel openssl openssl-devel pcre pcre-devel libaio
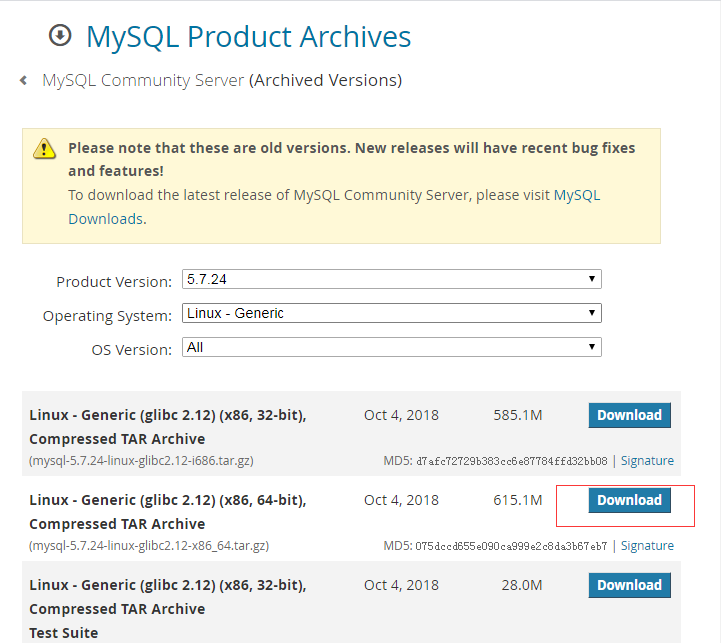
//从mysql官网下载二进制安装包(https://downloads.mysql.com/archives/community/ )
# rpm -qa | grep mysql
# rpm -qa | grep mariadb
mariadb-libs-5.5.65-1.el7.x86_64
# yum -y remove mariadb-libs-5.5.65-1.el7.x86_64

//下载或使用ftp上传工具上传mysql5.7的二进制安装包压缩包 mysql-5.7.24-linux-glibc2.12-x86_64.tar.gz

//解压文件 mysql-5.7.24-linux-glibc2.12-x86_64.tar.gz
# tar -zxvf mysql-5.7.24-linux-glibc2.12-x86_64.tar.gz

# mv mysql-5.7.24-linux-glibc2.12-x86_64 /usr/mysql
# cd /usr/mysql
# cd ls -a

//新建mysql的data目录
# mkdir data
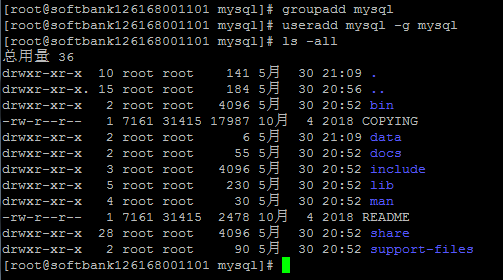
//添加新的用户组和新的用户
//新建用户组【mysql】
# groupadd mysql
//新建用户【mysql】并且归属用户组【mysql】
# useradd mysql -g mysql
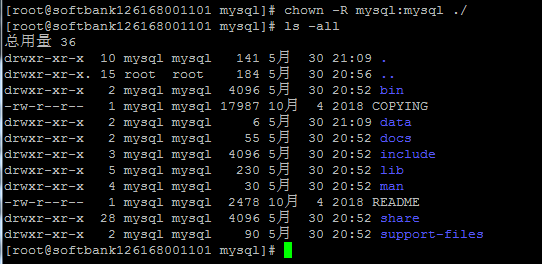
//修改mysql目录用户为刚刚新建的mysql组中的mysql用户
//修改文件或目录所属用户组
//# chgrp -R mysql ./
//修改文件或目录所属用户
//# chown -R mysql ./
//#chown -R 用户:用户组 路径
# chown -R mysql:mysql ./
//初始化安装mysql数据库
# ./bin/mysqld --user=mysql --basedir=/usr/mysql --datadir=/usr/mysql/data --initialize
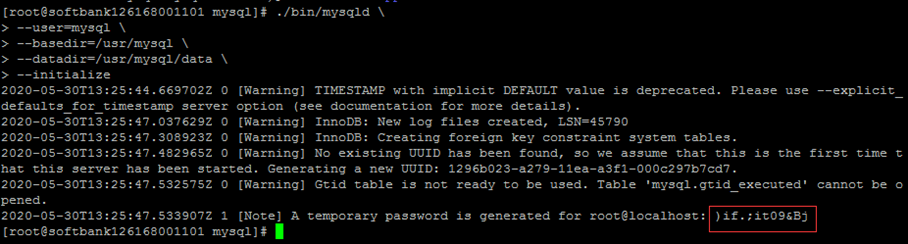
//安装出错,如:error while loading shared libraries: libaio.so.1: cannot open shared object file: No such file or directory 这个错误,解决方法是: yum install -y libaio
//添加到MySQL 启动脚本到系统服务
# cp ./support-files/mysql.server /etc/init.d/mysqld
//或者# cp /usr/mysql/support-files/mysql.server /etc/init.d/mysqld

# vim /etc/init.d/mysqld


//保存退出(按下 Esc 键然后 :wq)
//启动mysql
# /etc/init.d/mysqld start

//加入开机启动
# chkconfig --add mysqld
# chkconfig mysqld on
# vim /etc/profile
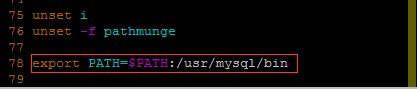
//使配置文件的配置立即生效
# source /etc/profile
# service mysqld restart
//或者 # systemctl restart mysqld
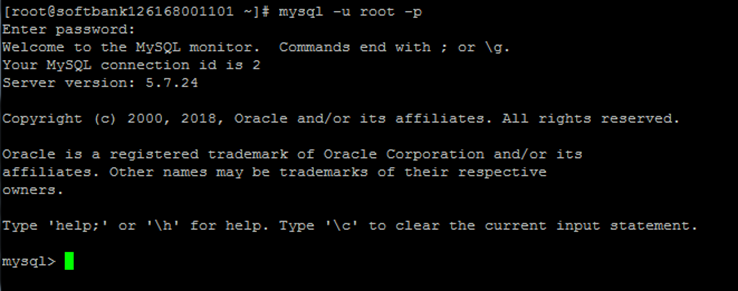
//修改root用户的密码为root123456 ,并且刷新
mysql> alter user 'root'@'localhost' identified by 'root123456';
mysql> flush privileges;
//创建新用户并且设置可远程登录【用户 admin , 密码为 admin123456 】
mysql> create user 'admin'@'%' identified by 'admin123456';
//授权【admin 用户对数据库的操作权限,这里是拥有所有数据库的所有操作权限】
mysql> grant all privileges on *.* to 'admin'@'%' with grant option;
mysql> flush privileges;
参考链接:
https://www.jianshu.com/p/8cb0189a3278
https://www.cnblogs.com/binblogs/p/11244663.html
===== 2024-02-05 更新start =====
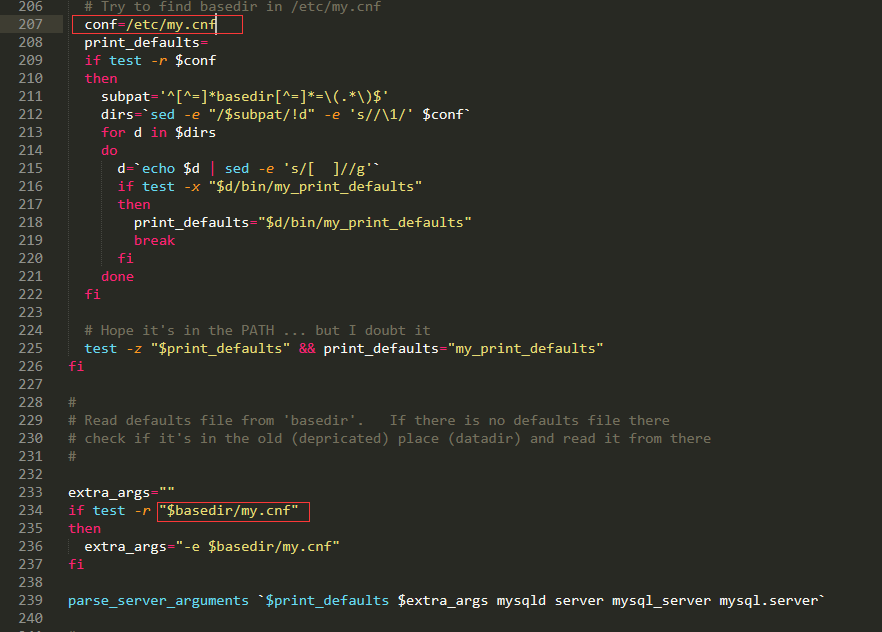
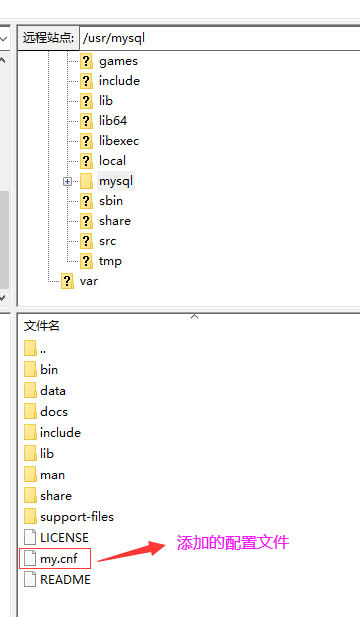
可以在 /usr/mysql 这个目录下添加文件 my.cnf ,用来额外配置mysql
为什么呢,查看了 /usr/mysql/support-files/mysql.serer 这个文件或者之前把这个文件拷贝到这个路径 /etc/init.d/mysqld
文件配置内容有读取 my.cnf 这个文件配置,如图:
my.cnf 配置内容为:
 [mysqld]

port = 3306
# 指定临时文件目录
tmpdir = /var/www/temp_dir

skip-external-locking
key_buffer_size = 256M
max_allowed_packet = 20M
table_open_cache = 256
sort_buffer_size = 2M
read_buffer_size = 1M
read_rnd_buffer_size = 4M
myisam_sort_buffer_size = 64M
thread_cache_size = 8
query_cache_size= 128M
query_cache_limit = 4M

# 服务端使用的字符集默认为utf8mb4
character-set-server=utf8mb4
# 创建新表时将使用的默认存储引擎
default-storage-engine=INNODB
# 跳过数据库权限验证,使登录时跳过权限检查
# skip-grant-tables
# mysql服务器支持的最大并发连接数
max_connections = 500
# 允许连接失败的次数。这是为了防止有人从该主机试图攻击数据库系统
max_connect_errors = 20

bulk_insert_buffer_size = 100M

# log-bin=mysql-bin
# binlog_format=mixed

# Remove leading # to set options mainly useful for reporting servers.
# The server defaults are faster for transactions and fast SELECTs.
# Adjust sizes as needed, experiment to find the optimal values.
# join_buffer_size = 128M
# sort_buffer_size = 2M
# read_rnd_buffer_size = 2M

## sql_mode=NO_ENGINE_SUBSTITUTION,STRICT_TRANS_TABLES,NO_AUTO_CREATE_USER
## lc-messages-dir = /usr/mysql/share
没配置的应该就是使用默认的配置了。
===== 2024-02-05 更新end =====